By: Jessica Patterson
Most modern websites have multiple pages. While the content and information on each page may change, many things remain constant on each page.
PHP can help speed up development of complex sites by giving you the ability to create templates and manage content within the WordPress dashboard.
For example, your website header that features your site name, logo, and menu would likely be featured on each page. When building a static website with HTML and CSS only you would have to include the code for your header on each page of your website. If your website has many pages or is managed by more than one person, this can be very tedious. WordPress uses PHP to make website management faster and more user friendly.
On a WordPress website, you can create new pages, update posts, and edit menu items in the WordPress dashboard instead of changing the code every time you want to make a change.
WordPress uses PHP to create HTML dynamically. This helps us utilize plugins, manage multiple page templates, and add new pages and blog posts to our website.
In order to follow along with this tutorial you’ll need a WordPress website with the Code Camp starter theme installed.
Adding a menu
In it’s simplest form, a menu is just an unordered list of links. On a static website, you could create a menu with HTML that looks like this:
<nav>
	<a href="https://theredsunflower.com">Home</a>
	<a href="https://theredsunflower.com/about">About</a>
	<a href="https://theredsunflower.com/contact">Contact</a>
</nav>
Instead of creating a static menu, we’re going to create a menu with PHP that will allow us to manage the menu from the WordPress dashboard.
Navigate to the header.php file in your theme using the Theme Editor plugin. Take a look at the <nav> element around line 31. Right now, this part of the website is not currently visible because it is commented out. You can create comments in HTML code by adding <!– to the beginning of your comment and –> to the end of your comment. In PHP code you can make comments by adding /* to the beginning of your comment at */ to the end of your comment.
Remove the comments from the <nav> section of your code so that it looks like this:
<nav>
	<div id="menu">
            <?php wp_nav_menu( array( 'theme_location' => 'menu-1', 'menu_id' => 'primary-menu' ) ); ?>
        </div>
</nav><!-- #site-navigation -->
Update the file then return to your website and refresh the page- your unordered list of menu items should be visible on the website. Now we can edit our menu within the WordPress dashboard instead of within the code itself.
If you get an error, you may have a typo in your code. Return to the theme editor and make sure your code looks exactly like the example above.
Adding New Pages
If you click on any of the links in your new menu the website will take you to a new page that looks exactly like your home page. In the WordPress Starter theme, the only page template we have created so far is the index.php file. Because it is our only template so far, any time our website goes to display a page, it displays the code in the index.php page.
To add more pages to our website we need to add a new template file to our theme.
In the theme editor, click on Create and create a file named front-page.php (you must copy this exactly or it will not work). WordPress will use this new template ONLY when displaying the front page (homepage) of the website and will refer to the index.php file in all other instances.
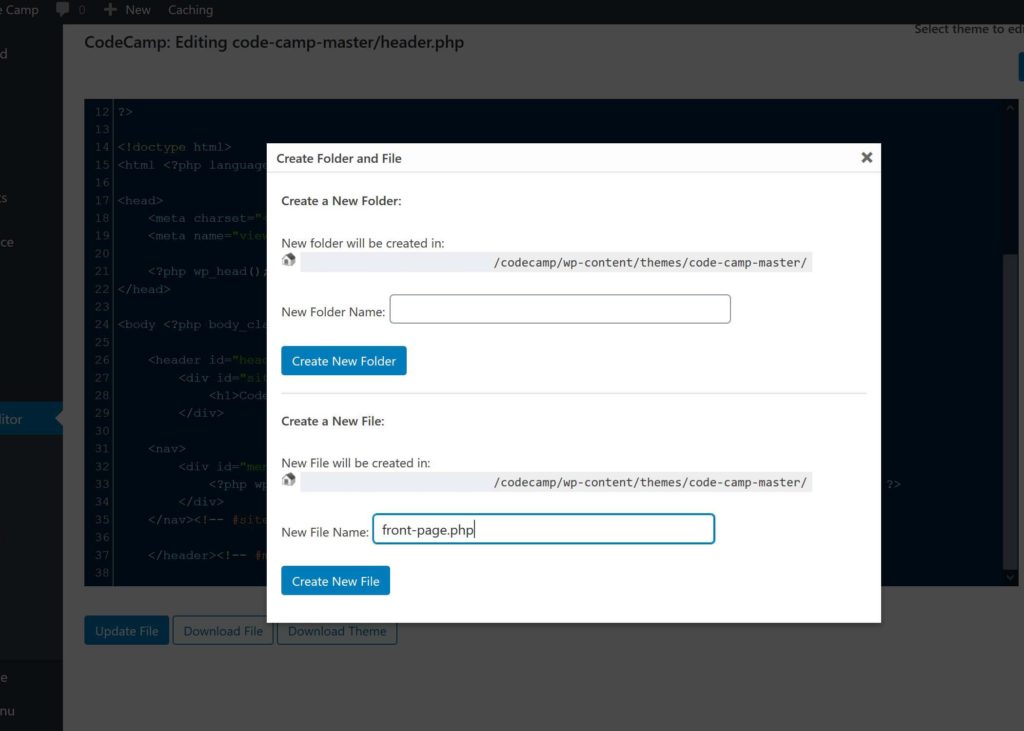
You must refresh the page to see the newly created file.
Then, copy all of the code from the index.php file and paste it into the front-page.php file. Save the file.
Return to the index.php file, delete all of the existing code and paste in the code below:
<?php
/**
 This is the page that is displayed if nothing more specific exists
 *
 * @link https://codex.wordpress.org/Template_Hierarchy
 *
 * @package CodeCamp
 */

get_header(); ?>

<div id="page">
	<div id="other-content">
		<?php

		// checks if there are any posts that match the query
		if (have_posts()) :

		  // If there are posts matching the query then start the loop
		  while ( have_posts() ) : the_post();

		    // the code between the while loop will be repeated for each post
		    ?>

		    <h2 id="post-<?php the_ID(); ?>"><a href="<?php the_permalink() ?>" rel="bookmark" title="Permanent Link to <?php the_title(); ?>"><?php the_title(); ?></a></h2>

		    <p class="date-author">Posted: <?php the_date(); ?> by <?php the_author(); ?></p>

		    <?php the_content(); ?>

		    <?php

		    // Stop the loop when all posts are displayed
		 endwhile;

		// If no posts were found
		else :
		?>
		<p>Sorry no posts matched your criteria.</p>
		<?php
		endif;
		?>
	</div><!--content-->
</div><!--page-->

<?php
get_footer(); ?>
This code is called the WordPress Loop it tells WordPress to display content entered within the WordPress dashboard.
Save the file and return to your website. Now, when you click the links in your menu it should take you to a new page.
To create new pages (in your WordPress dashboard) Go to Pages > Add new Add your content then click Publish.
To add your page or post to your menu Go to Appearance > Menu.
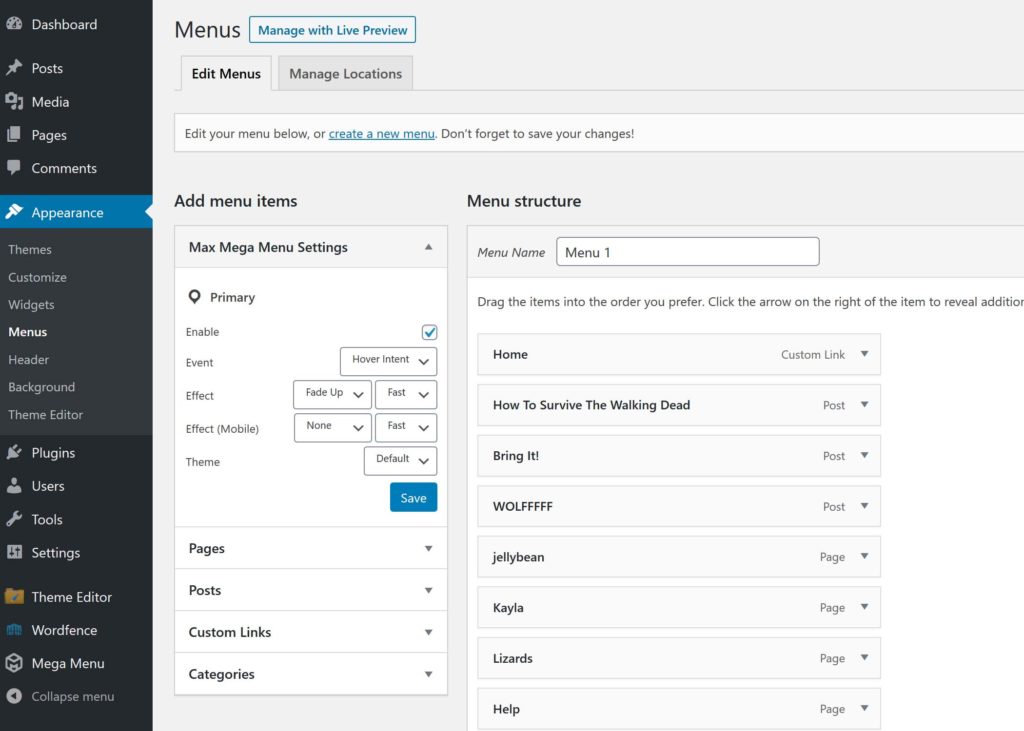
On the left of the screen you’ll see a list of your posts, pages, categories, etc. Click the checkbox next to your desired menu item then click Add to menu. Drag and drop your menu items until they are in the order you want.
Leave a comment.